This is a genuine user review of the Sage Bambino Plus espresso machine, or the Breville Bambino Plus if you’re outside of Europe, written by someone (me, Kev) who has a lot of experience with this espresso coffee machine.


– at the time of writing I have a discount code that Sage Appliances have provided for coffee blog readers – however I’m only permitted to send the code via email, I can’t publish it here. Join my “brew time” mailing list here, and then drop me an email – if the code is still active I’ll email it to you directly. I say
realreview of the Sage Bambino Plus, by the way, due to the reality that it’s rare when searching for coffee making equipment reviews (or when searching for any forms of reviews) to find an actual user review. Before writing this review, I wasn’t able to find a single genuine user review of the Sage Bambino plus. Not that I’m saying there weren’t any or there aren’t any now other than my Bambino review, nevertheless I couldn’t find any that I believed to be genuine user reviews. A lot of coffee machine reviews and “best coffee machines” type blog posts (not simply coffee machines either, it’s true of all products), are written by professional writers who’re hired to write articles for blogs and other websites. These forms of reviews are largely based on science, and from reading the marketing blurb, and contain extremely little (if anything) in terms of genuine, valuable user feedback. If you’ve read any of my other posts, you’ll understand that coffee blog is completely different to commercial blogs. The reviews I write are real user reviews I’ve created of the coffee machines, espresso machines, coffee grinders, coffee brewers etc., that I’ve first used for long enough to allow me to create true user reviews. So if you’ve searched for “Sage Bambino Plus Review” or “Sage Bambino Coffee Machine” hoping to find an actual, honest review written by someone who knows a bit bit about espresso coffee machines, who’s spent some time using the Bambino plus, you’ve found what you were looking for!
My Sage Bambino Plus Review.
Breville Australia, make some actually innovative coffee machines – which are known in the UK as Sage coffee machines, due to the truth that the brand name was sold here in the 80s. There’s the famous Sage Oracle range of bean to cup machines, and the equally renowned Barista range, including the Barista Express, Barista Touch & Barista Pro. One of their a lot of popular coffee machines within the past couple of years, has been the Sage Bambino Plus, so of course I had to get my hands on one, use it for a few weeks and review it.
Update February 2021
A few weeks turned into a few months, and a few months turned into a couple of years! I’ve been utilizing the Sage Bambino plus now for over 2 years, and this review has been amended over this time so I can share more of the stuff I’ve figured out about the Bambino Plus over this time. So basically keep in mind now as you’re reading this review, I’m someone who has real experience with this particular espresso coffee machine. Over the past five years or so I’ve also had experience of several other espresso machines, which means I’m likewise in rather a rare position of being able to tell you how this machine compares to others that you may be considering within a similar price range. [embedded content] [embedded content]
My Sage Bambino Plus Review in a Nutshell
I’m going to start this review by cutting to the chase and telling you what I think of the Bambino plus in a nutshell, after using this machine as my main home espresso coffee machine for a few weeks initially, followed by utilizing it for a couple of years. In short, I think this is an amazing little espresso coffee machine. This is why I’ve carried on using it as my main espresso coffee machine. I’d go so far as to say that if you were thinking of buying any other customer degree semi auto espresso coffee pump espresso coffee machine, so literally just about any other machine on the market at under £300 – you’d probably be producing a better decision by spending a little bit bit more on the Bambino.
The reasons I say that:
You’re getting a 9 bar machine which comes with both standard and pressured (dual walled) baskets. My videos below explain the differences. Most other customer extent espresso machines are 15 bar machines, and most of them come with pressured portafilters or pressured baskets. What this means is that the Bambino has the potential to create better tasting espresso than other domestic machines, but the option is there for anyone who prefers the convenience of pressured baskets. For more on this see 15 bar machines & pressured baskets. It has a PID (digital temperature control), which you’re really unlikely to find on other cheaper (or even more expensive) consumer degree machines. Again, this implies the Bambino has the potential for better tasting espresso, and likewise better consistency from one shot to the next, as the majority of of the cheaper machines suffer from temperature instability. The PID on the bambino pulls the temp back down after steaming (very quickly) and keeps it at the preset brew temp while pulling shots. It has a ridiculously fast heat up time (3 seconds) & uniformly fast steam ready time. Other low cost espresso coffee machines may only take a minute or so longer to heat up, but I don’t understand of any other single boiler espresso machine that is steam ready and then brew ready again as quickly as with the Bambino Plus. It has low pressure pre-infusion, which is factory set to about 8 seconds, but which you can also control manually. This is a feature you would usually only find on MUCH higher cost espresso coffee machines, and again it offers the Bambino better shot quality potential as pre-infused shots are less likely to suffer from channelling, which is one of the most common triggers of poor tasting espresso. It has the ability to produce decent milk texture automatically, with three different temperature settings and three texture settings. However it also has the ability to create MEGA milk texture manually, with a bit bit of practice. There’s no doubt in my mind that the Bambino is leaps and bounds above the lower cost espresso coffee machines on the market that I’m aware of, when it comes to milk texturing. So all the above combined suggests the Bambino plus has the ability for better espresso coffee and better textured milk than with practically any other espresso coffee machine on the market within a price range of up to around £300. Truly the only machine I think extremely competes with the Bambino plus at this price, is the Gaggia Classic. But, of the box without any modification, in my simple opinion, the classic isn’t up to the abilities of the Bambino plus, not straight out of the box. I enjoy the Gaggia Classic. I have this espresso machine too, the original pre 2009 and the new Gaggia Classic Pro. It’s capable of better espresso than the Bambino plus, however only through time, effort & investment in modding. It doesn’t come with a PID, as the Bambino Plus does. You have to pay for that separately and retro fit it. It doesn’t come at 9 bar, you have to mod it to be 9 bar, though that’s quick and only about a tenner. It doesn’t have the ability for pre-infusion, unless you fit a more expensive PID kit which includes pre steeping. The same is true of the Rancilio Silvia, too. An espresso coffee machine at a hundred quid or so above the Bambino Plus & the Gaggia Classic. So, straight out of the box, with no modifications, the Sage Bambino plus, as far as I’m concerned is among the best espresso machines at present for this sort of price – both in terms of shot quality, and certainly in terms of user friendliness and beginner friendliness. Add to the above that it’s incredibly compact, portable & good looking, and there you have the reasons that it’s extremely hard to get hold of one of these machines at the moment, as they’ve become one of the the majority of popular espresso coffee machines in the UK.
Using the Sage Bambino Plus in an Workplace – Quick Tip
The guys who design these machines are very clever, I’ve met among them, and I learn this is a team of people who pride themselves on going much further than most other coffee brewing device designers, even inventing many the parts essential to make their ideas possible. So why these guys didn’t think to add basically maybe 1cm of height to this tiny machine, by designing a drip tray which uses all of the depth of the machine, I’m not sure. Maybe I’m missing something – probably, I’m no machine designer! This wouldn’t put me off buying the Bambino though. As I say, you just get used to regularly emptying the drip tray. However here’s a quick tip for you, if you are looking for a coffee making device to utilize in an office, home workplace, or another room which isn’t close to a sink. After steaming milk, give the wand a wipe & then instead of pushing it back into position above the drip tray, literally stick a jug or a cup, a jar, a jug or something similar under the wand to save guzzling to go & empty the drip tray straight away. If whatever you’re using is too tall to fit under the wand, such as a bottle, just remove the drip tray, pull the Bambino to the edge of the desk/worktop, and push the wand into position above a bottle. Then screw the cap on and basically empty it at the end of the day when you likewise empty the drip tray (which will still need emptying as the solenoid valve will dump water directly in there after pulling shots). To be fair, straight out of the box the Bambino would probably beat the Classic in a scrap, in terms of espresso coffee quality & shot consistency thanks to the PID on the Bambino which the classic lacks, and the 9 bar pressure of the Bambino vs 12 bars with the Classic. But the Classic has the potential to be made capable of better shot quality than the Bambino. You can extremely easily & cheaply (about a tenner) switch out the over pressure valve spring to make it 9 bar, and for around £100 you can mod the classic to do away with the need for temperature surfing. For around £150 you can add a PID which likewise includes pre-infusion. If you invest in a higher quality espresso coffee mill, along with the pressure mod and the PID, then overall you have a machine which in all likelihood would be rather a little more capable when it comes to espresso quality, than the Bambino. Yes, by this time you would have also invested rather a bit more cash than you would have with the Bambino, nevertheless you’d also have a setup which is likely to last a lot longer. The Gaggia Classic isn’t a consumer level machine in terms of build quality and potential life span. While machines like the Bambino are basically designed to last the 2 year warranty, and any more utilize you get out of it after that is considered a bonus – the Classic is a more old school machine which can be fettled with, serviced and maintained over the years & will probably still be going strong in ten or even twenty years if looked after. My Gaggia classic old model is still going strong after 17 years. The classic isn’t for everyone, it’s definitely not as user friendly and as beginner friendly as the Bambino. But, for anyone who sees themselves as a home barista, and is focused on being able to pull the extremely perfect quality shots possible, and doesn’t mind doing a bit of modding, at the same RRP the Classic might be a better match.
Full Sage Bambino Plus Review
So – there we go, that’s the shortened version of the Sage Bambino Plus review post. For anyone who’s after a little bit more detail, and has some more time to kill:
Dimensions & Specs
Size:19.5 cm wide, 32cm deep & 31cm tall.
Construction:Stainless Steel
Boiler:The new ThermoJet® thermocoil.
Water Tank:2 quarts, removable, with filter.
Steam wand:Proper steam wand (not a panarello) with both auto milk frothing, and manual texturing.
Power:1600 Watts.
Warm up time:3 Seconds…
Warranty: 2 Year Repair, Replace or Refund Guarantee. Baskets:Recent stock ship with single and double fundamental baskets and single and double dual wall baskets. Older stock may come with only dual walled baskets, so if you’re not buying directly from Sage Appliances (which I would suggest you do if you’re buying now, as I can’t find them as cheap anywhere else) I would suggest that you check with the retailer whether you’re getting among the newer units with the fundamental baskets.
First Impressions
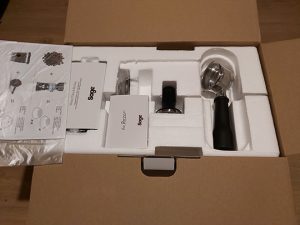
On unboxing this machine, the first thing to impress me about the Bambino plus, is its compact stature, and how pretty it is to look at. I’m not surprised about that, Sage do make very shiny, pretty looking espresso machines, but I was pleasantly surprised by the size of the water tank. It has a bigger water tank than lots of other small espresso machines, at 2 quarts, which is a in fact good size for such a compact machine. This little machine isn’t going to take up much room on your kitchen worktop, and it’s only likely to enhance the look of your kitchen. While some espresso machines can look a bit industrial, Sage espresso machines never do, they’re always designed to look as pretty as possible in modern kitchens.
3 Second Warmup Time
The next thing to impress me about this machine, is the ridiculous 3 second warm up time – and by the way, this is real, it’s not a over the top marketing, this machine in truth does heat up in 3 seconds. Obviously, the group, the portafilter etc., will all need a little of warming up, so you’ll need to pull some water through the portafilter to get everything warmed up before pulling your shot, nevertheless even after doing that you’ll still be pulling your shot within 10-15 seconds of turning on the machine, which is very impressive, and has me wondering if perhaps there’s some alien technology at work here from a certain downed craft from Roswell New Mexico…
9 Bars of Pressure
Another impressive feature of the Bambino plus, is the 9 bars of pressure – which is the ideal pressure for espresso coffee. You’ll see many lower cost espresso coffee machines, and even some at a similar price point to the Bambino, being marketed as 15 bar pump machines, along with marketing blurb which appears to insist that 15 bars of pressure is a beneficial thing. If 15 bars of pressure is good, why are professional espresso machines that are used by pro Baristas everywhere, 9 bar? The truth is just that 15 bar pressure works for very low cost machines, particularly for those that are designed to utilize pressurized baskets – and more on them shortly. Even with the Gaggia Classic, as I mentioned earlier, you have to mod it to make it 9 bar, it comes factory set to 12 bar, which I think is to make it work a bit better with pressured baskets if the user decides to work with them quite than to work with them as indoor frisbees, which is what I reckon they’re better for. So the truth the Bambino plus comes at 9 bars out of the box, is an exceptionally positive thing for this little machine.
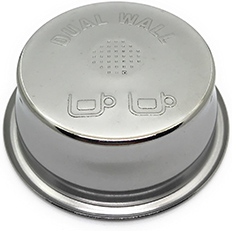
Single Baskets Vs. Dual Wall Baskets
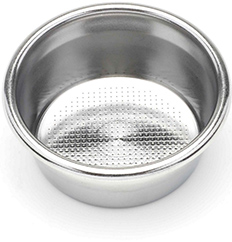
The Sage Bambino plus comes with both single and double shot baskets as single walled fundamental baskets, and dual walled pressurized baskets. Well, the newer stock does. If you’ve already bought among these and yours only came with pressured baskets, you can get them directly from Sage Appliances, when they’re in stock, for a fiver. However Sage have told me that the latest stock of the Bambino comes with both standard and pressured baskets. Standard filter baskets have a load of holes at the bottom, to allow the extracted coffee to filter through while preventing the coffee grinds from ending up in your espresso coffee. Pressured baskets (or dual walled baskets as Sage call them) on the other hand direct all of the extracted coffee through an exceptionally small hole, thus creating pressure in the basket itself, which is supposedly a way to produce espresso without a capable espresso coffee grinder. So the idea is that you can work with pre-ground coffee beans (which are generally speaking quite a bit more coarse) or use a mill not capable of grinding fine enough to get good impacts via a fundamental baskets, for more accessible home espresso coffee. To be fair to pressured or dual walled baskets, although I’ve just discussed them as only being fit for being used as indoor frisbees, I can simply see the benefit of these baskets. Dialing in (meaning to adjust the grind in order to nail the extraction) is a pain, it takes time and money in the terms of wasted coffee beans, and of course having a capable espresso mill suggests investment too – so I know the idea of pressured baskets.
Truly, as I discovered when making the videos I’ve shared below, as long as you’re using decent coffee beans in the first place, with the Bambino the espresso coffee via the dual walled baskets is OK. I found from taste testing with the same coffee freshly ground and pre ground, that it tastes better freshly ground via the fundamental baskets, but still, the pre-ground via the pressured baskets was OK, it wasn’t awful, the espresso via the basic basket & freshly ground espresso coffee tasted better, but it wasn’t a massive difference. I’ve tasted absolutely awful espresso via other espresso coffee machines that come with pressured baskets. I assume that’s a result of the combination of 15 bars of pressure, pressured baskets & poor temp stability leading to channeling, which creates potential for actually bad tasting stuff which has no right to be known as espresso coffee. Nevertheless it’s not rather the same with the Bambino. Thanks to everything else this machine has going for it including the 9 bar pressure, PID & pre steeping, the bambino is capable of OK espresso coffee even with pressured baskets & pre-ground coffee – as long as you use good quality coffee, of course.
Low Pressure Pre-Infusion
This is something I forgot to mention in the video, mainly due to the reality that I’m a muppet. T his clever little espresso coffee machine has low pressure pre-infusion, which is something I wouldn’t expect to find on an espresso coffee machine at this price point. Even the Rancilio Silvia doesn’t have this feature – simply to get an espresso coffee machine with low pressure pre-infusion you’d usually have to spend around a thousand pounds or more – except for the Sage machines. As well as guzzling factory pre-set pre-infusion, if you pull your shots manually, you can manually control the pre-infusion length too. To do this, you just press and hold the shot button, and pre-infusion will begin at this point. When you’re done with pre-infusion, just let go of the button and the pressure will start to increase. When you want to stop the shot, push the flashing shot button again. By the way, re pre-infusion time, I’d suggest somewhere between 6-10 seconds, but whatever you pick, I’d recommend sticking with and only changing if you’re trying to modify to improve results. I’d advise keeping all the other elements the same & only alter one thing at a time, I.e. grind size, tamp pressure, dose or pre-infusion time. Another point about pre-infusion, a common issue is whether the pre-infusion time needs to be added to, or included in the total shot time, and it’s the latter. If you’re looking for around 30 seconds for instance, to extract the desired amount of liquid espresso from the ground coffee at the brew ratio you’re using, for example 2:1 (19g dry ground coffee:38g liquid espresso coffee), then this 30 seconds is the total shot time including the pre-infusion time. For a brilliant guide on all this technical stuff, I’d highly recommend James Hoffman’s YouTube series on dialing in, beginning with: How I Dial-In Espresso – Part #1
PID Controller
I’ve found the Bambino to be basically consistent from one shot to the next – and what’s mainly to thank for this, is the fact that this machine has a PID, which is rare thing to find in an espresso coffee machine at this type of price point. A PID controller, usually just called a “PID”, which stands for
Proportional
Integral
Derivative, is simply an algorithmic temperature controller. PIDs are used for all sorts, they’re controllers which work with an algorithm to keep things at a defined set point, and in the case of espresso coffee machines, this is temperature. What having a PID implies, is that you do not need to stress about the temperature wildly fluctuating while pulling the shot, as the temperature is controlled by the PID. What this suggests is better shot quality and more consistent shots than would be the case if the temperature wasn’t PID controlled. As I explained earlier, machines like the Gaggia Classic and Rancilio Silvia have to be modded in order to benefit from PID control, so the fact that this machine, at this price point, as a PID, is a very bit plus for the Bambino. The only other espresso machines at anywhere near this type of price point that have PIDs that I’m aware of, are the other Sage espresso coffee machines.
Milk Steaming Capability – Automatic.
So let me get this straight – this little espresso coffee machine, available for a few hundred quid, will automatically texture milk for me? Yup. Not only that, but I can select from three milk temps, and three texture settings? Yup. I’ll stop talking to myself now – but this was basically the internal conversation I had when I first heard about the auto milk texturing features of the Sage Bambino plus. But I had a bit of an issue with it. I like steaming milk manually, it’s taken me ages to (literally about – however still not rather) master the art of correctly texturing milk, and I don’t truly want to press a button. I soon discovered that the Bambino’s steam wand can also be used manually! So if someone like me wants to steam milk manually, then I can fill my boots – and if someone else in the house just wants textured milk at the touch of of a button, I don’t have to get up off my arse and go texture the milk for them. But the milk this machine can texture automatically is probably pretty rubbish right? Wrong! This flipping smug little machine can almost do as good a job of texturing milk at the touch of a button as I can manage manually after four or five years of trying to master the art of manually texturing milk! I did say in the first review video that there was something wrong with the temp setting on the Bambino when steaming automatically, nevertheless I later on. updated my YouTube channel to confirm that there is simply something wrong with me, I’m an idiot. I didn’t have the milk jug on the temp sensor appropriately. I’ve used the Bambino numerous times since utilizing the auto steaming feature, and it actually is very good. I can usually get mildly better impacts manually using the Bambino, however only really slightly – and there’s no doubt that the texture via the auto steaming feature is better than I could manage for at least a year or two, or maybe more, into learning to texture milk manually.
Quick Auto Milk Steaming Tips
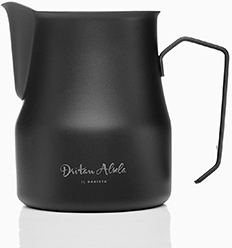
The Sage blurb & instructions tell you that you need to utilize the jug that comes with the machine in order to utilize the auto milk texturing feature. I have come to favour the 500ml Motta milk jugs lately, the jugs used by latte art king Dritan Alsela. Just out of interest, I tried the Motta 500ml jug with the auto steaming, and it worked perfectly.
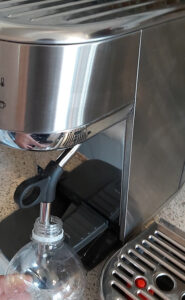
Keep the jug on the sensor.As I explained earlier, I didn’t do this during my first video review, and as a result it didn’t work properly because the machine didn’t understand what temp the milk was at. The position of the jug is towards the back of the drip tray, so you have to remember to press the jug towards the back so it’s sitting on top of the sensor.
Keep the sensor dry.I’ve found in some cases the foam and the temp to be mildly inconsistent, but someone told me via a YouTube comment that this occurs when you don’t keep the sensor dry. So I experimented with wiping the temp sensor before steaming to ensure it’s dry, and this does seem to be the case – so literally check the temp sensor is dry before steaming milk on auto.
Experiment with temp and foam settings.We’re all different, you may like your coffee hotter or cooler than me, you may like a more dry foam than me, etc., so just experiment and see what temp and foam combination works best for you.
The Cleaning Cycle
This is a backflush cycle. Backflushing is where you work with a blind disk, or “backflush disk” which blocks the holes on the filter basket, and you put a cleaning tablet, or a little bit of backflush powder into this, and pull a series of short shots, literally. At some point (it’s supposed to be after 200 shots) the bambino will start winking at you – alternately flashing the single shot and double shot buttons. This implies that it wants you to do a backflush cycle. If you’re not ready, push the steam button, and it’ll let you carry on – however next time you turn it on it will wink at you again. So just put the single basket in (dual wall or fundamental, doesn’t question) – put among the cleaning tablets that it comes with, in the little indentation, lock the portafilter in, and press the single and double shot buttons together for at least five seconds, and then both of the shot buttons ought to be lit up solid – at this point, push either of the shot buttons just once, and the cycle ought to begin. Ignore the stuff in the instructions about putting a bowl under the portafilter, it’s wrong. No water comes out of the portafilter, that’s the point of the backflush disk, it goes through the internals and directly into the drip tray. I think the reason for this misleading info in the instructions is that initially the backflush disk had a hole in it and water did come directly out of the group, nevertheless they changed this and didn’t change the instructions. It’ll go into ready mode once it’s done – at which point basically put the backflush disk somewhere safe, give the portafilter a rinse and empty the drip tray.
Some backflushing tips:
The Bambino decides when.It doesn’t appear possible to go into the backflush cycle manually. I tried this in the video below and later on. reported that I realised I’d brewed a fairly common schoolboy error, in that I’d in truth basically re-programmed the single shot button to the maximum, quite than entering the backflush mode. So if you want to backflush before the Bambino winks at you, extremely do it manually, by doing putting the cleaning tablet on the backflush disk and then pulling five or six 10 second shots, or until the tablet or power dissolves.
Bambino won’t stop winking.This is rather common, and it could be that your machine fancies you, or more than likely it’s that it doesn’t think you’ve completed the backflush cycle. So simply do it again, without a cleaning tablet in there if you’re sure you did extremely put it through a proper backflush the first time, and just make sure you’re definitely starting the cleaning cycle by keeping both shot buttons pressed together for at least 5 seconds. Make sure you keep them pressed until both lights go solid, and then a single push of either button – and make sure you’re also allowing it to complete the cycle, don’t touch it until it goes back into fundamental ready mode.
Cleaning tablets are pricey.The little cleaning disks from Sage are not cheap, but you can get cleaning powder which is way more cost effective. I work with Puly Caff which is about a tenner for 900g, so this works out far cheaper. Not only that, however you can also use this to clean your portafilter & steam wand tip. Likewise, I find this stuff is amazing for keeping the stainless steel suface clean. Literally mix a little bit of the powder in hot water and give the bambino a wipe with it, followed by drying it with another cloth, does a fantastic job! I tried this because I worked at McDonalds as a kid, and we used to utilize an exceptionally similar powder for cleaning down metal machines, I can’t remember the name of that stuff but this powder looks and smells extremely similar, so I tried it to see if it would do the same job, and it does.
The Descaling Cycle
The Bambino will tell you it wants you to descale it by alternately flashing the shot button lights and the steam button light for 15 seconds each. You can cancel it by pressing any of the flashing buttons, however it’ll prompt you again the next time you turn on the Bambino. So here’s what to do. Turn the machine off, so it starts to cool down while you’re getting ready to descale. Remove the filter from the water tank. The big white thing with the numbers on the top, this is your water filter, take that out, and then fill the water tank to the “DESCALE” line – which is at the 1L mark. Open the descale sachet, pour the contents into the water tank and give it a stir with a stirry type implement such as a spoon. Remove the portafilter, you don’t want this in while it’s descaling. Put a Jug or bowl under the group and steam wand, you’ll need 2L capacity. You only need 1L capacity for the first part of the descale cycle, but for the second part, the rinsing cycle, you need 2l. If you do not have a big enough bowl then basically use two bowls and replace one with the other half way through the rinsing cycle. Push the single shot button and steam button together for 5 seconds, to enter the descale mode. You’ll understand it’s beginning the descale when the single shot button light and steam button light both go solid – at this point, push either the single shot button or the steam button to start the descale cycle. Both buttons will continuously flash while it’s descaling. Once the 1L of water has been used up, the descaling will pause while you refill the water tank, this time fill it to the max line – empty the jug or bowl, then put it back in place and the single shot button and steam button will go solid again, press the steam button or single shot button again to resume the cycle. Once the cycle is complete, the single shot button light and steam button light will start blinking again, and the bambino will go into standby mode. At this point, empty the bowl, rinse both the drip tray and the water tank – put the water filter back in, and you’re all sorted.
Conclusion
To conclude – I’m hugely impressed with the Sage Bambino plus. I think it’s a basically good option for anyone wanting an espresso machine who’s looking for a particularly user friendly entry to home espresso. It’ll produce good tasting espresso coffee (as long as you use great quality coffee of course), it’ll create fantastic textured milk, and it’s cleverly designed to produce a great user experience even for the complete home espresso novice. I also think it’s a ideal preference as a back up machine for home baristas with a much higher appreciate setup for when they need coffee fast and their machine isn’t warmed up & ready. It’s likewise a fantastic machine in terms of portability, I stuck the bambino in the boot lately when we went on holiday to Cornwall, it took up hardly any space, and there was no faffing around at all getting it set up once at the holiday cottage, simply straight out of the boot, plugged in, filled up – and ready for much required coffee within seconds. The Bambino Plus is definitely among the best home espresso machines you’ll come across when it comes to beginner friendliness, and shot quality straight out of the box, at this price point. This article firstly appeared at
Coffee Blog– The UK Specialty Coffee Blog – For Lovers of REAL Coffee!
Frequently Asked Questions
What is the Sage Bambino Plus espresso machine?
The Sage Bambino Plus is an espresso machine manufactured by Breville Australia and marketed under the Sage brand name in the UK and Europe. The machine is marketed outside Europe as the Breville Bambino Plus. It has become one of the manufacturer’s most popular coffee machines in recent years, alongside other models in the Oracle and Barista ranges.
Is the Sage Bambino Plus the same as the Breville Bambino Plus?
The Sage Bambino Plus and Breville Bambino Plus are identical machines with different brand names based on geographic region. The machine is sold as Sage in the UK and Europe, while it carries the Breville name outside Europe. The brand name difference exists because Breville Australia sold the Sage brand name in the UK during the 1980s.
How long should the Sage Bambino Plus be tested before reviewing?
Extended testing periods of several weeks to months provide more comprehensive evaluation data for the Sage Bambino Plus. Testing duration for this particular machine extended beyond two years, allowing for assessment of long-term performance characteristics and identification of features that only become apparent through sustained use. Prolonged testing enables more accurate user feedback compared to brief evaluations based primarily on specifications.
What other Sage espresso machines are available besides the Bambino Plus?
Sage offers several espresso machine ranges manufactured by Breville Australia, including the Oracle range of bean-to-cup machines and the Barista range. The Barista range includes multiple models such as the Barista Express, Barista Touch, and Barista Pro. These machines represent different feature sets and price points within the manufacturer’s espresso machine lineup for the UK and European markets.
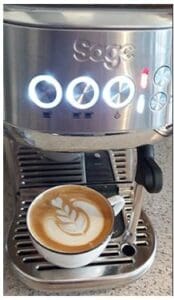
Can latte art be made with the Sage Bambino Plus?
Latte art can be produced using the Sage Bambino Plus espresso machine. The machine includes milk texturing capabilities that enable creation of microfoam suitable for latte art patterns. Successful latte art production requires proper milk steaming technique and appropriate espresso extraction, both of which the machine is designed to facilitate through its integrated features and controls.