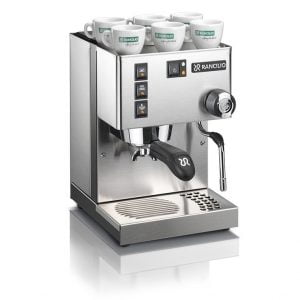
This is my review of the famous Rancilio Silvia espresso machine – the latest version (at the time of writing) the Silvia E V6 2020, which delivers the SCA-standard 9-bar espresso extraction that specialty coffee enthusiasts seek. You may disagree with this, and respond that surely the Silvia Pro is the latest version of the Silvia, and maybe you’re right. In my humble opinion though, the Silvia Pro is not the Silvia… but more on that shortly, and I will include details on the new Silvia Pro, too.
So the Rancilio Silvia was one of the very first true home barista espresso machines, and although I don’t have any sales figures, I suspect that it’s still probably just as popular a machine now as it was back then. Yes there are more home barista machines on the market these days, but when it comes to commercial-grade, single boiler machines intended for home use, there still isn’t a huge amount of competition. Commercial espresso machine manufacturer Rancilio actually made it as a limited edition run in the late 1990s, as a gift to say thanks to some of their best-performing distributors.
“Miss Silvia” as it was referred to at the time, was a hit with those it was gifted to, and Rancilio decided to make it available to the public. It quickly became a success, and there have been several refined versions over the years, the latest being the Rancilio Silvia E V6 2020 – and this is the version I’m reviewing.
Over the years the Rancilio Silvia has consistently been regarded as one of the best, and certainly one of the most popular single boiler espresso machines for home baristas. If the term “single boiler” has you stumped – there are three types of boiler formats used in home espresso machines: single boiler, heat exchanger, and dual boiler. The cheapest domestic espresso machines don’t tend to have boilers; they usually have thermoblocks, which are on-demand water heaters. Most of the £100-£200 entry-level espresso machines have these on-demand water heaters versus actual brew boilers. Nearly all home barista espresso machines (with a couple of exceptions) have brew boilers and are either single boiler, heat exchanger or dual boiler configurations.
The exceptions are the entry level Sage (or Breville if you’re across the pond) machines, the Bambino Plus, Barista Express & Barista Pro, which (in my humble opinion, but everyone is entitled to theirs) deserve to be considered entry level home barista machines rather than as standard domestic espresso machines. These are thermocoil machines, by the way, a slightly more reliable and better performing, more modern version of the thermoblock which have a copper coil inside the block as opposed to the water running through a coil-shaped channel in the block.
Thermoblock or thermocoil aside, when it comes to boilers, single boiler machines are the most economical to produce, as one boiler is obviously cheaper than two, and they don’t require the additional components needed in a heat exchanger machine. Single boiler espresso machines can often be more compact, and as well as being cheaper they can use a bit less electricity too, as there’s only one boiler to heat, whereas heat exchanger machines usually have a bigger boiler to heat up than with single boiler machines. The only inherent limitation with single boiler machines, really, is that you can’t steam milk and pull shots at the same time; you have to do one at a time.
For many people though, this isn’t a big enough drawback to warrant the jump in price from single boiler to heat exchanger or dual boiler. I would hazard a guess, though, that most people who do decide to go for heat exchanger or dual boiler machines are doing so more (or solely) for other reasons other than just being able to steam milk and pull shots simultaneously. In fact, I know there are many people who have such a machine who still prefer to do the two things separately so they can put more focus into the quality of the shot extraction and the texture of their microfoam.
The other reasons to go for a heat exchanger or dual boiler machine are that generally speaking, manufacturers tend to put the best features on these machines, as they’re usually the higher end models in their product lines. The one obvious exception to this being the ECM Classika PID which has the same high-end features (adjustable PID temperature control, E61 grouphead, pressure gauge, shot timer) as their flagship dual boiler machine the ECM Synchronika, but with a single boiler. Up until now I’ve mainly used single boiler espresso machines, and not being able to steam the milk while the shot is pulling really hasn’t bothered me, and I do mainly make milk-based drinks.
I’ve recently started using the Sage Dual Boiler in order to review it (spoiler alert – I flipping love that machine!) and although when I have remembered that I can do both at the same time, it’s definitely much quicker, half the time I forget and do it separately anyway. Dual boiler machines simply have two separate boilers, a brew boiler and a steam boiler, so they don’t need much explanation. Heat exchangers have one boiler (usually a bigger boiler than with single boilers, for example the Oscar 2 has a 2L boiler) with a heat exchange pipe running through it to heat up the water for the shot.
So as far as single boiler machines go, the Rancilio Silvia has been one of the most popular since its introduction – and if you were to ask anyone who knows a little bit about espresso machines to suggest a shortlist of potential single boiler espresso machines to go for, I’d be surprised if anyone wouldn’t include the Rancilio Silvia in that list. But, it’s not perfect. Arguably, no espresso machine is perfect – but certainly, at the entry-level price point, you’re going to find some imperfection, so what I’m really hoping to find out by reviewing the Rancilio Silvia, is what are the pros and cons of this machine, and who might it be best suited for.
By the way, the Rancilio Silvia was provided (on loan only) for this review from my friends at Shop Coffee in Cambridge. These guys are the retail, home barista side of Coffee World, a very reputable coffee roaster who’ve been at it for decades.
Rancilio Silvia E V6 2020 – Specs
I’ll quickly share the specifications of the latest Silvia version, and then I’ll get on with my review.
- Stainless steel casing
- 2 L water tank
- 300ml boiler, marine-grade brass, insulated
- 1100W stainless steel internal heating element
- 58mm heavyweight, angled commercial portafilter
- Solid brass group head
- 3-way solenoid valve
- Stainless steel steam wand on a ball joint, with a single-hole steam tip
- 23.5cm wide x 29 cm deep x 34cm tall. 14Kg
- Stainless steel tamper with a black wooden handle
Rancilio Silvia E V6 2020 – Price
Check Price – Shop Coffee The Rancilio Silvia is among the best-priced entry-level single boiler espresso machines, delivering the 9-bar extraction pressure defined by the Specialty Coffee Association standard. If you think this is an expensive espresso machine, welcome to the world of home espresso, as this is actually an entry-level home barista machine designed for serious enthusiasts. When shopping around for this machine, I recommend doing your due diligence, especially if you find it cheaper, as only a few actual UK-based authorized suppliers carry this machine, and it is unlikely you will find it much cheaper than the price Shop Coffee retails it for.
Some suppliers grey import from Italy, so make sure you are buying a machine that does have a UK warranty; you do not want to have to return a machine to Italy if it needs warranty work.
My Rancilio Silvia Review
Initial impressions
The Silvia arrived very well boxed—while packaging doesn’t impact machine performance, robust internal cushioning matters for preventing transit damage to precision espresso components that must meet the Specialty Coffee Association’s 9-bar espresso definition for proper extraction. Upon unboxing, the build quality immediately stood out. This is a substantial machine, weighing approximately 14 kg, and its stainless steel construction and commercial-grade aesthetic set it apart from typical domestic kitchen appliances. The build quality is impressive for a prosumer-level espresso machine at this price point. The portafilter’s heft was immediately noticeable—Rancilio equips the Silvia with the same 58 mm commercial portafilters used in their professional café machines, delivering the thermal stability and durability baristas expect from commercial equipment. The consistent 58 mm diameter also means you can use precision baskets and tampers from the same ecosystem without adapter rings.
The steam wand offers excellent range of motion for texturing milk in various pitcher sizes, and the low-profile drip tray maximizes clearance for taller cups while maintaining a clean, professional appearance.
Using the Rancilio Silvia
I have to be honest and say that as far as espresso goes, I didn’t get on brilliantly with this machine to begin with—there was a bit of a rocky start. I think this was partly down to the basket which comes with the Silvia, and also partly down to me not realising at this point that the hex bolt that holds in the shower screen is ginormous. I didn’t RTCM to begin with (Read The Chuffing Manual) so I was trying to do the standard 18g of ground coffee to 36g of espresso—the typical 1:2 ratio recommended by baristas like Scott Rao for balanced extraction—while I should have been using 14-16 grams with that basket. Getting the grind size right for that smaller dose proved tricky with my initial setup.
There was a huge hole in the top of the puck that I’d usually associate with over-dosing the basket. I then RTCM and discovered that the basket which comes with the Rancilio Silvia is a 14/16g basket, to which I replied (internally) “why??”—and then jumped on ‘tinternet and bought an 18 gram IMS precision basket from Shades of Coffee. Initially, I was confused as I was still getting that chonking great hole in the top of the puck even when under-dosing the basket, leading to a very sloppy puck with a big hole in it, so apparently under-dosing and over-dosing at the same time, how odd.
I then discovered that the hex bolt that holds the shower screen in place is roughly the size of a small dog. Once I understood that this hole in the puck was there to stay—caused by the oversized dispersion screw rather than my dosing technique—I stopped worrying about it, and at this point I got on better with the 18g basket. A proper tamp with even pressure distribution helped compensate for the bolt’s effect on water flow.
I’m sure I’d have got on fine with the 14/16g basket too if I’d have figured that out, but still, I’d prefer 18g than 14 or 16g. It wasn’t plain sailing with the milk steaming side of things either. The first time I tried to steam milk with the Silvia, I turned the steam on and waited for the heating light to go off, as per the instructions (I RTCM at this point) – and I nearly blew a hole in the kitchen worktop! OK, maybe I’m being slightly dramatic, but wow – I’ve never seen steam power like this, even on commercial machines.
Steam power is excellent for achieving the 140-150°F microfoam texture recommended by barista trainers for latte art and cappuccino, but only if you can control it, and I can’t even imagine latte art master Dritan Alsela being able to manage this kind of steam pressure. Actually, who am I kidding? Dritan could probably produce great milk texture from the orient express & pour mega latte art from a bucket.
I was heating up around 250 ml of milk (in a 500 ml jug) to around 65°C in something like 12–15 seconds, and I couldn’t get the kind of texture I wanted, as the steam was just blowing the milk all over the place, although I have to say that the milk texture even from this 12 to 15 seconds of obliteration was actually really quite good—I’d just liked to have a bit more control of the aeration phase. Lance Hedrick and Chris Baca both emphasize that controlled aeration is the foundation of quality microfoam, and this machine demands a different approach. I did some testing and found that this huge blast of steam lasts around 20 seconds after “officially” being ready to steam, so one thing I could do would be to just blast off the steam for 20 seconds or so until it drops to something a bit more manageable.
That worked, and at that point I found the steam still to be really powerful, but manageable. The problem with that, though, is you’re looking at two to two and a half minutes after turning on the steam button until you start steaming, which seems like a long time for a single-boiler machine workflow. I then remembered that the Gaggia Classic has a similar quirk. With that machine I find that if I turn the steam on, wait just 7 or 8 seconds, and then start steaming regardless of the fact that the machine isn’t telling me the steam is ready yet, it works brilliantly.
So I experimented and found that depending on the current boiler temp, somewhere between 30–45 seconds after turning the steam on was the sweet spot for starting steaming, and that’s good as it cuts down the overall time it takes to make a milky drink. I carried on using the machine a good few times per day, and over that time I tried various different things to try to develop the best workflow with the Rancilio Silvia, and in the end, this is what it ended up looking like.
My temperature surfing routine with the Rancilio Silvia V6
I’m sure if you’ve spent any time at all researching the Rancilio Silvia, or the Gaggia Classic, you’ll be familiar with the term temperature surfing. (According to the SCA Golden Cup standard, brewing water should be between 90°C and 96°C (195°F–205°F)) It simply means to get the machine to the right temperature (ish) and it’s usually associated with shot temperature. What I’ve found though, with the Gaggia Classic too to be fair, is that without a PID fitted, you need to temperature surf for both the brew temp, and steam temp/pressure. It’s the opposite way around with the Gaggia Classic though.
With the Classic I find that if you wait for the steam light to indicate steam is ready, you tend to run out of steam due to the tiny boiler, but if you start much sooner—before the ready light illuminates—you have decent power for longer.
Grinding & puck prep
I’ve been steaming milk first and pulling shots second with the Silvia, as I’ll get to shortly, so I got into grinding and doing puck prep first, and putting the portafilter down ready to go, so that I’m not leaving the milk cooling down for too long while I’m faffing about grinding, distributing and tamping. I’ve been using the Eureka Mignon with the Silvia, the Specialita version which was also provided (on loan) by shop coffee. I’ve used this grinder before, and using it with the Silvia reminded me of what an excellent grinder this is for espresso workflow, especially considering the relatively low cost.
I’ve been doing the same puck prep routine that I usually do with other espresso machines, which involves doing the WDT (Weiss Distribution Technique) with this inexpensive mechanical keycap puller that I just snipped the ends off. Research done by folk a lot more technical and experienced than me, including work by barista researchers like Lance Hedrick, appears to suggest that using two tools may produce the best results: 0.4mm diameter pins for deeper WDT and then thinner (around 0.2mm) pins for dealing with the surface layer. So I’ve bought this 0.4mm tool, and this 0.25mm tool both from Etsy, along with some other tools from various places that I’m going to be experimenting with.
I’ll create a video about this once I’ve figured out what I think works best, and I’ll update this post accordingly when I’ve done that. In the meantime, for an in-depth video on WDT at the moment I think this one from Lance Hedrick is probably the best:
Milk First
This is a contentious subject, and I usually favour shot first, milk second when working with a single boiler machine, meaning I can’t pull the shot and steam milk at the same time. I understand the arguments for the other way around, but in my humble opinion, when you’re making a milky drink (flat white, cappuccino, latte), given that the majority of the liquid in the cup is the milk, it’s the milk cooling down that is most likely to negatively impact the overall enjoyment of the drink.
As long as you’re not leaving a shot sitting there for much longer than a minute, I personally don’t find it changes noticeably in taste by the time you’ve poured a jug of milk into it – espresso expert James Hoffmann notes that shots remain stable for approximately 60-90 seconds before the crema begins breaking up significantly. I started out with milk first with the Silvia simply because of that 2 minute wait time for the steam. If you’re going to be waiting that kind of length of time until you start steaming, I think it makes sense to steam the milk first rather than leaving the shot sitting there with the crema slowly disappearing.
In my opinion, if you’re steaming the milk within 30-45 seconds of turning the steam on, given that at this point it’ll only take around 30 seconds to steam the milk, I think you could choose to steam first or pull the shot first, whatever you prefer – but I just got into steaming milk first with the Silvia and carried on like that.
Temperature surfing the milk
As I’ve mentioned, I do this with the Gaggia Classic by turning the steam button on, and then purging the steam and beginning steaming after just 7 or 8 seconds – and with the Rancilio Silvia, I’ve found it’s somewhere between 30 – 45 seconds. The bigger gap between sweet spots is, I assume, just down to the larger boiler in the Silvia (the Silvia’s 300 mL brass boiler versus the Gaggia’s 100 mL aluminum boiler). I did find that you can gauge this by putting your ear close to the machine so you can hear the boiler, there’s a slight drop in volume which indicates it’s ready to start steaming.
If you wait the full 2 minutes, you’ll hear a total drop in volume at the point the light goes off, but as I’ve said, I found that there’s too much steam power at that point without spending 20 seconds or so letting that out. You could wait for the full approx. 2 minutes and then not open the steam valve fully, I have seen some doing this on YouTube, but that doesn’t seem to make the most sense to me. The steam power isn’t very stable at this point, and why wait 2 minutes and only open the valve slightly when you can wait just 30 seconds and turn the valve fully?
So, I turn the machine on – and if it’s the first shot I’ve pulled or if the machine hasn’t been on very long, I’ll usually leave it about 45 seconds – if the machine’s been on for a while or it’s the second or third drink I’m making, I’ll just leave it 30 seconds after turning on the steam, I’ll then give it a quick blast to lose any condensation, and start steaming.
When I’ve aerated the milk and have moved to the rolling phase (which is only after maybe 10-15 seconds with the Silvia), I’ll turn the steam button off part way through the rolling phase so that when I close the steam valve and move on to pulling the shot, it doesn’t take quite as long to bring the boiler temp down.
Temperature surfing the shot
So with the milk done, and the steam button already turned off, and without the portafilter in place (as I’ve already ground the coffee into the basket so this is ready to go) I press the shot button, and open the steam valve. Water will start to flow through the wand, and after a few seconds, the heating light comes back on – now is the time to insert the portafilter and pull the shot. This technique, known as temperature surfing, helps stabilize brew temperature on single-boiler machines by timing extraction to coincide with the heating element’s active cycle.
I’ve started the video below at the appropriate point so you can get a visual of what I’m going on about.
As you’ll see, it’s a little bit messy, you do get water splashing on the kitchen worktop a bit, but it’s nothing a cloth can’t deal with ;-).
The Good Stuff
The build quality looks and feels great, it really is a solid-looking little unit, and it does have a commercial espresso machine aesthetic to it, which I like. (the SCA-standard 9-bar espresso definition) It’s very simple to use in terms of the controls, there’s simply an on and off button, a shot button, steam button and hot water button – and the steam knob. The portafilter is a really nice quality, commercial-grade portafilter which helps the machine to look and feel more like a small commercial machine than a domestic kitchen appliance. The potential shot quality once you’ve dialed in your technique with the machine, is very good.
The steam power is incredible, as I’ve said – capable of texturing milk to the microfoam standards professional baristas aim for.
The Meh Stuff
I’m referring to these things as “Meh” rather than bad, as it feels unfair to refer to these things as “bad” as such. These are just the quirks of this machine, they’re fixable or work-aroundable, if that’s a word, apparently not according to the spell checker. The main issue for me is the temperature instability of this machine without fitting a PID, and the fact that you never know exactly where you’re at when it comes to brew temperature or steam pressure.
It’s always going to be more of an art form than a science with this machine unless you fit a PID—a concern echoed by espresso experts like Scott Rao, who emphasizes that precise temperature control is critical for consistent extraction. This is the same with the Gaggia Classic, although to be fair to the Classic, that’s about a hundred quid cheaper. As I mentioned earlier, I’m using the Sage Dual Boiler at the moment, too, and with this machine I know exactly what the temperature is when I’m pulling a shot, plus I can adjust this in one-degree Celsius increments.
So if I open a bag of coffee and it’s a bit on the lighter roasted side I’m taking the brew temp up slightly to help with the fact that lighter roasts can require a bit of a higher temperature to properly extract—typically 93-96°C compared to 90-93°C for medium roasts, according to Specialty Coffee Association extraction guidelines. Also the steam boiler temperature is consistent too, so as soon as I open the steam I get the required pressure, and that’s also adjustable. With the Silvia, it’s not just that you can’t adjust the temperature, it’s the fact that you’re guessing at it.
At the point the heating light goes off or comes back on, you don’t know exactly what temperature you’re at, it’s always a guestimate. This comparison isn’t fair, as the Sage Dual Boiler is just over double the cost of the Rancilio Silvia, but I’m just explaining what it is about the lack of temperature control that I’m not keen on.
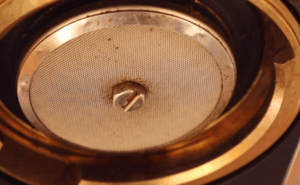
Probably a more fair comparison is the ECM Casa V, it’s almost £300 more than the Silvia, and it doesn’t have a PID—but the type of group it has (saturated) means the temperature is a lot more stable, so although you can’t change it, you know that when you’re in brew mode you’re going to be at or very close to 93°C, which the machine is set to (200°F). The gargantuan hex bolt on the shower screen seems an odd choice.
I’ve mentioned in other posts and videos a step in puck prep called “Do not disturb”, which just means once you’ve distributed and tamped, you don’t want to disturb the puck of coffee or you may end up with channeling as a result. Putting a ruddy great bolt in the group which is larger than the headspace for the basket, is a spanner in the works when it comes to not disturbing the puck. As soon as you lock the portafilter in, this bolt digs a hole in the surface of the puck.
Does this actually impact on cup quality, I’ve no idea, but I don’t like the idea of it regardless—and I would assume that it certainly can’t help in terms of avoiding channeling, which occurs when water finds preferential pathways through the coffee bed rather than flowing evenly, as detailed in James Hoffmann’s espresso troubleshooting guides. As I mentioned in my video review, you can fix this with the flat shower mod from Pidsilvia.com—the only issue there is that although this is fairly inexpensive ($30, including the screen, the countersunk screw and the drilled jet breaker)—it’s in the US, so by the time you take delivery cost into account you’re talking somewhere between forty to fifty quid.
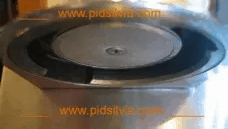
You can do a DIY job by getting an M5 12mm screw, but if you want it to be completely flush, you’d need it to be a countersunk screw and you’d need to drill out the jet breaker (the bit of metal the shower head screws into), so it becomes a bigger job. Another little niggle is that because the drip tray is low profile, at its highest position to the side, the steam tip isn’t quite high enough to exit a jug without tipping the jug, which can lead to spillage.
I can’t help but feel they could have made the drip tray slightly higher profile, given it a bit of a bigger volume, making the whole machine a bit taller, allowing the user to take the wand out of the jug without spilling milk—a common issue when steaming to the SCA-recommended 55-65°C range for microfoam. There’s an easy way around this though, which is to get a knockout drawer to stand the machine on top of, which will raise the machine up a bit, and give you a bit more clearance, while also giving you a tidier solution for used pucks than a standard knock box.
Another tiny niggle, is that the rubber feet are just stuck on with adhesive, and one came off at one point when I was moving the machine. I put it back and it stayed put, but the rubber feet on the Gaggia Classic go into a hole in the bottom of the frame rather than relying on adhesive, which seems like a more robust design choice. Not a massive deal though. The drip tray is also a bit unusual, in that when you remove it it’s just a tray of water, there’s no lid of any description, so you do have to be careful if it’s full, not to chuck it all over the place.
This isn’t helped by the fact that there’s no drip tray full indicator, either. I do hope that the above doesn’t come across as if I’m slagging off this very well-known and very well-respected espresso machine. That’s not the intention at all, I’m just trying to very honestly point out what I think are the good bits, and the not-so-good bits, so you can decide whether or not it’s the right machine for you. The important thing is, I think, most of the above can be worked around, either with routine or with modding.
What I would do if I bought the Rancilio Silvia
I’ve not bought the Silvia, I have to give it back soon – at which point I’ll be reviewing another espresso machine from Shop Coffee, but if I were to buy this as my main home espresso machine, I’d do a couple of things. (the SCA-standard 9-bar espresso definition)
I’d mount it on a knock-out drawer as I mentioned above, and it would still be short enough to fit under kitchen cupboards.
I’d either do a DIY job of replacing the hex bolt, or, more than likely I’d just buy the kit from PidSilvia.com, because I’ll do DIY stuff – only to coffee machines, in case my wife is reading this, who knows that my idea of DIY is Do It (in about a) Year – at a push, but only if I really have to ;-).
The one thing I’d definitely do is fit a PID controller. This would eliminate the need for temperature surfing, and would allow the brew temperature to be adjusted precisely. According to espresso experts like Scott Rao, consistent temperature control is critical for repeatable extraction, and a PID lets you pull shots at a specific temperature, which may come in handy if you’re wanting to use a range of roast profiles.
To explain that answer – at the price without the mods I’ve mentioned, you’re getting a very capable espresso machine that needs a bit of taming either via modding or with routine. (the SCA-standard 9-bar espresso definition)
Rancilio could have fitted a PID, but then it wouldn’t be at the low price point it’s at, and you wouldn’t have the choice of whether to work around these quirks or invest in fitting a PID and a couple of other bits to get around them.
In fact Rancilio have now released a version with a PID, the Silvia Pro:
Rancilio Silvia PRO Dual Boiler
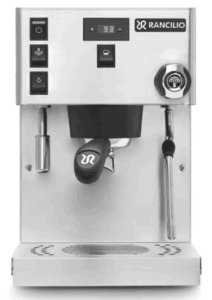
Check Price – Shop Coffee This is a great looking machine, actually – I saw it when I was at shop coffee collecting the Silvia. Its very simple to look at, understated, and it does look like the Silvia but a bit bigger – it’s really not, though, it’s nothing like the Silvia at all, really. Personally, I wish they’d release a single boiler version of the Silvia, with the factory installed PID, with the shot timer, and without the small-dog sized hex bolt. That version could probably have been called the Silvia Pro. What they’ve released as the Silvia Pro bares only aesthetic similarity to the Silvia.
This is a dual boiler machine, with PID control, dedicated water outlet, water level indication, pre-programmed wake up time – and a shot timer. To call this the Silvia Pro is like Ford releasing the Ford Fiesta, and then calling the Kuga the “Fiesta Pro”. They’re clearly completely different machines. Don’t get me wrong, I’m not knocking the new Silvia Pro, it looks great, and for the price I think it’s going to do very well – as it’s a very competitively priced dual boiler machine from a very trusted name in the espresso equipment industry.
But it’s not really an alternative to the Silvia, it’s a completely different kind of machine at a much higher price point, and with much more advanced features for temperature stability and steam power. So going back to the original Silvia, at a similar price, even if you do decide to go to the expense of the suggested mods, there’s actually nothing else for the same kind of price that really competes even when taking modding into account. To get a PID which controls the brew temp, steam temp and also gives you pre-infusion, you’d need KIT-RSPb from Auber instruments.
I’m not sure if there are other PIDs available which give the same level of control, but this is the more expensive of the PIDs that Auber make, it’s $199, and the cheaper one is $149.50 but that will only give you control of the brew water temp. So this is £109 or £145. Shipping (I’ve just got a quote) to the UK at the time of writing is $32, so £23 ish. About £20 for the IMS precision basket, and then either about a fiver for the DIY option to be able to use that hex bolt as a doorstop instead, or $30 (about £22) for the kit from Pidsilvia.com.
Pidsilvia.com don’t list a UK delivery cost but I’d assume it’s going to be similar, although I have emailed them to ask if they would consider allowing UK customers to give them Auber’s address for delivery and I’ve emailed Auber to see if they’ll ship the flat screen kit with their PID to UK customers, as this will save you some cash. I’ll update this post when I get a reply.
So if you go for the more advanced Auber PID and the DIY screw replacement you’re looking at a total cost including the Silvia of about £720, and if you buy the flat screen kit, about £770 – although hopefully this will come down a bit if they agree to combine postage. For around £700-£800, there’s nothing I know of that you can buy off the shelf which would compete with the Silvia you’d have invested in. The “Silvia Pro” is a LOT more money, as that isn’t just a version with a PID, as I’ve mentioned. There’s the ECM casa V for a bit more money, but that doesn’t have a PID.
There’s the Sage Dual Boiler, but that’s four or five hundred quid more. The only option off the top of my head that I think would compete, would be a used or reconditioned Sage dual boiler, but then if we’re talking used or reconditioned that’s not a fair comparison either, I’ve just done an advanced eBay search and I can see Silvias with Auber PID already fitted have sold for between three and four hundred. So that’s quite a long winded way of saying yes, I think the Rancilio Silvia is worth it.
At the box price without a PID it’s a very affordable machine for what it is, and you can get good results with some practice and proper temperature surfing technique. At the fully modded price you have a machine which would be difficult to compete with, without spending quite a lot more money. This article firstly appeared at
You must be logged in to post a comment.