Your espresso tastes flat because you’re missing half the equation. Most home baristas obsess over finding the best Italian espresso machine for home but pair it with a mediocre grinder, sabotaging every shot. The right machine and grinder combination transforms your kitchen into a café-quality setup.
Quick Decision Guide
The Rancilio Silvia paired with a Eureka Mignon Specialita delivers the best balance of temperature stability, grind quality, and long-term value for most home baristas, while the Gaggia Classic Pro with a Baratza Sette 270 offers the strongest budget entry and the Lelit Bianca with Niche Zero suits enthusiasts who want flow-control experimentation without commercial bulk.
This guide addresses three core trade-offs:
- thermal stability versus footprint (single-boiler machines save counter space but require temperature surfing; heat-exchanger and dual-boiler models deliver back-to-back shots and milk drinks but occupy 14–18 inches of depth)
- grinder stepless adjustment versus ease of dialing (stepless micrometric collars offer infinite precision but demand patience; stepped grinders speed workflow at the cost of granularity)
- manual versus semi-automatic operation (lever machines teach shot profiling through direct feedback; pump-driven models ensure consistency for beginners)
Picks are grouped by budget tier:
- under $1,000 setups prioritize machines with brass boilers and capable 50–54 mm flat-burr grinders
- $1,500–$2,500 combinations add PID temperature controllers and low-retention single-dose hoppers
- $3,000+ configurations introduce E61 groupheads, rotary pumps, and conical burr grinders with titanium-coated cutting surfaces
Each pairing assumes you’ll pull 2–4 shots daily, prefer medium-roast single-origin coffees, and value repair documentation over appliance convenience.
Best Picks Compared
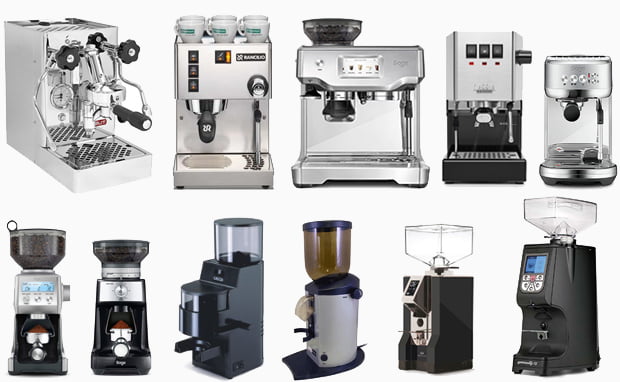
Choosing the right espresso machine and grinder pairing depends on balancing workflow speed, temperature stability, and upgrade potential against your budget and counter space. The table below highlights five proven setups that represent distinct approaches to home barista equipment, from compact single-boiler machines to dual-boiler systems with commercial-grade components, each optimized for consistent extraction across light to dark roasts.
| Product | Best For | Key Strength | Main Trade-off | Price Tier |
|---|---|---|---|---|
| Gaggia Classic Pro + Eureka Mignon | Beginners seeking upgrade path | Proven reliability with active mod community | Requires temperature surfing between shots | Entry ($800–$1,000) |
| Rancilio Silvia + Baratza Sette 270 | Hands-on learners | Commercial-grade brew group and PID-ready | Long heat-up time; single boiler limits workflow | Mid ($1,100–$1,400) |
| Sage Barista Pro (built-in grinder) | Space-conscious users | ThermoJet heating in 3 seconds | Integrated grinder limits separate upgrades | Mid ($800–$900) |
| Lelit Elizabeth + Niche Zero | Dual-boiler entry point | Simultaneous brew and steam; LCC control | Smaller steam boiler than premium models | Premium ($2,200–$2,600) |
| Profitec Pro 600 + Eureka Specialita | Serious enthusiasts | E61 group with rotary pump and PID on both boilers | Requires plumbing for best performance | Premium ($3,200–$3,800) |
Each pairing represents a different philosophy: the Gaggia and Silvia reward patience and technique development, the Sage prioritizes convenience, while the Lelit and Profitec deliver professional espresso machine performance at home with minimal compromise. Your choice hinges on whether you value learning curve, speed, or ultimate shot quality, and how much you want to refine your tamp and grind technique over time.
The Best Options to Consider
Gaggia Classic Pro + Eureka Mignon

Entry-Level Excellence: Gaggia Classic Pro + Eureka Mignon Notte Gaggia Classic Pro paired with the Eureka Mignon Notte delivers genuine espresso fundamentals without the $2,000+ price tag of prosumer gear.
This combination suits newcomers willing to learn manual techniques—temperature surfing, proper tamping, and steam wand control—while the Gaggia’s commercial-style 58mm portafilter and brass boiler provide a clear upgrade path through PID controllers and flow-control mods.
Rancilio Silvia + Baratza Sette 270

The single boiler means you’ll wait 60–90 seconds between pulling shots and steaming milk, which becomes tedious when making multiple drinks back-to-back.
Mid-Range Workhorse: Rancilio Silvia Pro X + Baratza Sette 270
Sage Barista Pro (built-in grinder)

Looking at complete machine-and-grinder setups removes the guesswork of pairing components and often saves money compared to buying separately. The following combinations represent tested configurations that balance workflow, upgrade potential, and budget across different experience levels.
Rancilio Silvia Pro X with the Baratza Sette 270 bridges the gap between hobbyist and commercial-grade equipment.
The Silvia Pro X brings dual boilers, PID temperature control on both brew and steam circuits, and volumetric shot programming that eliminates guesswork, while the Sette’s stepless micro-adjustment and 40mm conical burrs handle everything from light Scandinavian roasts to dark Italian blends with minimal retention (under 0.5g).
This pairing excels in kitchens where 4–6 milk drinks per morning are routine, though the Sette’s plastic construction feels less premium than its $400 price suggests and requires occasional shim adjustment to maintain grind consistency. The dual boiler design also ensures stable extraction pressure across consecutive shots, a feature typically reserved for machines costing twice as much.
Compact Automation: Breville Barista Touch + Breville Smart Grinder Pro
Breville Barista Touch matched with the Smart Grinder Pro offers guided automation in a footprint under 18 inches wide.
The Touch’s color display walks you through grind size, dose, extraction time, and milk texture with real-time feedback, making it ideal for households where multiple users want café results without studying extraction theory, and the integrated grinder’s 60 settings cover the full range from espresso to French press.
Expect to outgrow the 54mm portafilter and thermocoil heating if you develop a taste for single-origin light roasts or plan to serve more than two drinks consecutively, as heat stability lags behind true dual-boiler machines. For casual espresso drinkers who value convenience over precision, however, this setup delivers consistent results with minimal effort.
Enthusiast Investment: Lelit Bianca + Eureka Mignon Specialita
Lelit Bianca combined with the Eureka Mignon Specialita represents the sweet spot for serious home baristas who want commercial capability without three-group footprints.
The Bianca’s dual boilers, E61 group head, and paddle-operated flow control let you pre-infuse delicate naturals at 2 bar before ramping to 9 bar for extraction, while the Specialita’s 55mm flat burrs, timed dosing, and near-silent operation (measured at 65dB) make dialing in new beans a methodical rather than frustrating process.
This $3,000+ combination demands counter space (the Bianca alone is 14.5 inches wide) and a learning curve to leverage flow profiling effectively, but it eliminates the “what if I had bought better gear” regret that plagues incremental upgraders. The E61 group head also provides excellent thermal stability, maintaining consistent brew temperature throughout extended sessions.
Professional Home Setup: Decent Espresso DE1+ + Niche Zero
Decent DE1+ paired with the Niche Zero targets data-driven enthusiasts and remote workers who’ve turned espresso into a daily ritual.
The DE1’s tablet interface logs pressure, flow, and temperature across nine sensors in real time, Bluetooth connectivity lets you download and replay recipes from world barista champions, and the conical burr Niche delivers single-dose workflow with grind quality that rivals $1,000+ flat-burr grinders while producing zero clumping.
Budget $4,500 for this combination and accept that troubleshooting firmware updates and calibrating profiles requires comfort with both spreadsheets and portafilter technique—this isn’t plug-and-play equipment, but the diagnostic capability means you’ll never wonder whether a sour shot stems from grind size, water temperature, or channeling. For those who treat espresso as both science and craft, this setup offers unparalleled control over every variable.
How to Choose the Right One
Selecting the right espresso setup means balancing five core criteria that separate hobbyist gear from professional-grade home equipment. Temperature stability is the first non-negotiable. Dual-boiler and heat-exchanger machines like the Rancilio Silvia Pro or ECM Synchronika maintain separate steam and brew circuits, eliminating the cool-down wait inherent in single-boiler designs.
PID controllers let you dial brew temperature within ±1°C—critical when lighter roasts demand 93°C but medium roasts shine at 90°C. This precision directly impacts extraction quality, as the Specialty Coffee Association recommends a stable brew temperature for consistent results.
If you’re comparing machines in the Gaggia Classic Pro tier, expect 5-8°C swings without a PID; acceptable for milk drinks, limiting for straight espresso.
Grinder quality often matters more than the machine itself. Flat burrs (64-83mm) in grinders like the Eureka Mignon Specialita produce uniform particle distribution essential for even extraction, while conical burrs forgive minor technique errors. A consistent grind size is the foundation of repeatable espresso.
Stepless adjustment is standard on serious setups; stepped grinders rarely offer the precision needed when switching between a 25-second medium roast and a 35-second light roast using the same 18g IMS precision basket.
Build quality and serviceability separate €500 appliances from €2,000 workhorses. E61 groupheads (found on ECM, Profitec, and Lelit models) use passive preinfusion and all-metal construction that lasts decades. Machines with proprietary boilers or plastic internal fittings become expensive paperweights when parts disappear. Check whether your shortlist uses standard 58mm portafilters and widely available gaskets.
The Sage Barista Pro automates grinding and dosing but sacrifices manual control; the Sage Oracle Touch goes further with auto-tamping and milk texturing, trading hands-on craft for consistency. Conversely, separate-component setups (Gaggia Classic paired with a Niche Zero) demand more counter space but let you upgrade incrementally.
Budget allocation should follow the 1:1 or 2:3 machine-to-grinder ratio. A €1,200 Rancilio Silvia paired with a €150 blade grinder wastes the machine’s potential, while a €400 Sage Bambino Plus with a €600 grinder maximizes extraction quality at the entry tier.
Which Option Fits Your Situation?
Choosing the right espresso machine and grinder setup depends on three critical factors: your experience level, available counter space, and daily workflow. Best for beginners: If you’re new to home espresso, pair a Sage Bambino Plus with a Sage Smart Grinder Pro.
This combination delivers consistent shots with minimal learning curve, occupies roughly 18 inches of counter width, and costs under $800. The Bambino’s automatic milk texturing removes the steaming learning curve, while the grinder’s 60 settings provide room to grow.
The limitation? You’ll outgrow the grinder’s stepped adjustment within 12-18 months if you develop serious extraction skills. Best for intermediate enthusiasts: The Rancilio Silvia paired with a Eureka Mignon Specialita represents the sweet spot for committed learners.
This setup requires manual temperature surfing—waiting 15-25 seconds after the brew light activates—but rewards you with professional-grade steam power and stepless grind adjustment down to 5-micron precision. Budget $1,400-1,600 and expect a 2-3 month learning period before consistent results.
Best for experienced baristas with space: E61 heat exchanger machines like the ECM Synchronika or Profitec Pro 600 paired with a flat-burr grinder such as the Niche Zero or Eureka Atom deliver café-level control. These setups occupy 24-30 inches, require 20-minute warm-up periods, and cost $3,000-4,500.
The payoff is simultaneous brewing and steaming, PID temperature stability within ±1°F, and flow profiling capabilities that let you manipulate pressure curves mid-shot. Best on a tight budget: The Gaggia Classic Pro at $449 with a hand grinder like the 1Zpresso JX-Pro at $159 produces excellent espresso for under $650.
You’ll sacrifice speed—hand-grinding 18 grams takes 45-60 seconds—but gain grind quality that rivals $400 electric grinders. This approach is ideal for single-drink routines or patient weekend warriors who value precise extraction control.
Match your setup to your realistic daily routine, not aspirational goals. A $4,000 dual-boiler gathering dust helps nobody. Focus on consistent tamping technique and proper distribution to avoid channeling, and you will achieve repeatable results regardless of your budget tier.
Setup, Maintenance, and Common Mistakes
Getting your espresso setup right from day one prevents frustration and protects your investment. Here’s what matters most:
Initial Setup Essentials
- Water quality: Install a simple carbon filter or use third-wave water if your tap registers above 150 ppm TDS; scale buildup is the leading cause of premature boiler failure in machines like the Rancilio Silvia and ECM Mechanika
- Grinder calibration: Dial in your grinder with 18-20g of beans before pulling shots; most beginners waste a full bag trying to adjust mid-workflow
- Level your machine: Use a bubble level on the drip tray—unlevel E61 groupheads distribute water unevenly and cause channeling
Maintenance Schedule
- Backflush weekly with water only; use detergent (Cafiza) every 2-3 weeks for machines with three-way solenoid valves
- Descale every 3-6 months depending on water hardness—never descale more frequently than manufacturer guidelines
- Replace grouphead gaskets and shower screens annually on high-volume setups; the Gaggia Classic Pro’s stock gasket typically shows wear at 8-10 months
Mistakes That Cost Money
- Running the Sage Bambino Plus or Barista Pro without purging the steam wand burns out the auto-froth sensor within 18 months
- Grinding directly into the portafilter causes static clumping; dose into a cup first, WDT, then load
- Buying pre-ground “espresso” beans—oxidation begins within 15 minutes of grinding; you need a dedicated espresso grinder
Most setup problems trace to grind consistency and water chemistry, not the machine itself.
Frequently Asked Questions
What’s the minimum budget for a quality home barista espresso machine and grinder setup?
Expect to invest at least $1,000–$1,500 for a capable entry-level combination, such as the Gaggia Classic Pro paired with a Eureka Mignon grinder. Professional-grade setups with heat exchanger or dual boiler machines like the Rancilio Silvia Pro X and high-retention grinders typically start around $2,500–$3,000.
Should I prioritize spending more on the espresso machine or the grinder?
Allocate at least 40–50% of your total budget to the grinder, as consistent particle distribution matters more than most machine features for shot quality. A $400 grinder paired with a $600 machine will outperform a $900 machine with a $100 grinder every time.
Do I need a dual boiler machine to make café-quality espresso at home?
No—single boiler machines like the Gaggia Classic Pro and heat exchangers such as the Profitec Pro 500 produce excellent espresso when paired with a quality grinder. Dual boilers eliminate wait time between brewing and steaming and offer superior temperature stability, but skilled technique on a single boiler yields comparable shot quality.
How much counter space does a typical home barista setup require?
Reserve at least 24–30 inches of width and 18–20 inches of depth for the machine, grinder, and workflow clearance. E61 group machines like the ECM Mechanika occupy roughly 12 inches wide, while grinders add another 6–8 inches; compact setups like the Sage Bambino Plus fit tighter spaces at around 12 total inches.